If someone had told me a few years ago that I’d be stocking up on lentils and labeling cans like a doomsday prepper, I would’ve laughed. But here we are—facing wars, pandemics, food shortages, and extreme weather—all while the world feels more unstable than ever. That’s when I realized: having a 3-month emergency food storage plan isn’t just smart; it’s sanity-saving. Whether you’re prepping for a lockdown, supply chain hiccup, or even job loss, knowing you’ve got food for your family brings peace of mind. And yes—you can do it without breaking the bank. I did, and I’ll show you how.
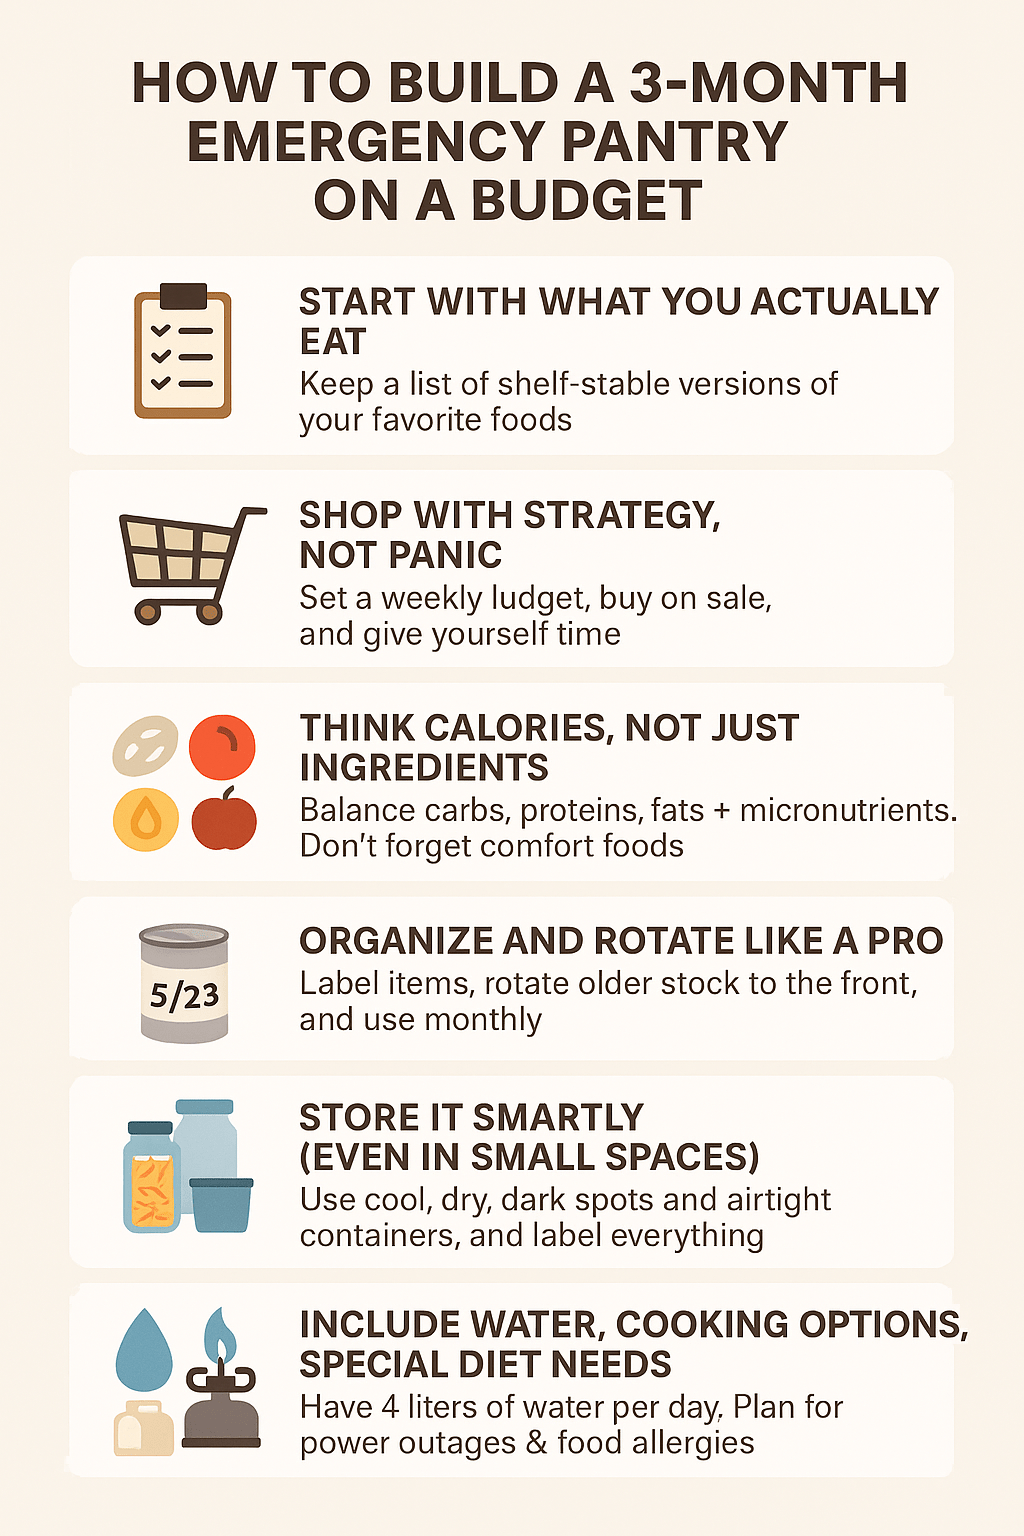
Step 1: Start with What You Actually Eat
The biggest mistake I almost made was buying weird “prepper” foods no one in my family eats. Instead, I started by writing down what we actually cook and eat on a weekly basis—things like rice, dal, oats, and canned tomatoes. From there, I looked for shelf-stable versions. Emergency food storage isn’t about mystery meals—it’s about comfort, familiarity, and nutrition. When things get stressful, the last thing you want is unfamiliar food. If you stick to what you already love, you’ll waste less, rotate stock more easily, and your pantry will actually feel like a backup kitchen—not a bunker.
Step 2: Shop with Strategy, Not Panic
Once I had my list, I set a small weekly budget—about the cost of one takeout meal—and hit the stores with intention. I hunted for sales, used cashback apps, and bought in bulk where it made sense. My favorite win? A 10kg bag of basmati rice that lasted months and cost less than a pizza. Building your emergency food storage slowly keeps your wallet happy and helps avoid hoarding. Remember, you’re creating a safety net—not panic buying. Check expiry dates, buy things you’ll actually rotate, and give yourself time. A little progress every week adds up fast.
Step 3: Think Calories, Not Just Ingredients
One mistake I made early on was focusing only on “healthy” foods—but in an emergency, you need calories to stay functional. A good emergency food storage plan includes a mix: carbs (rice, oats), proteins (beans, lentils, canned meat), fats (ghee, coconut oil, nut butter), and micronutrients (dried fruit, canned veggies, multivitamins). Don’t forget comfort food too—instant coffee, chocolate, or your favorite chai blend. These small things can lift spirits when everything else feels uncertain. I kept my pantry flexible, making sure it could handle no-cook days, one-pot meals, and times when energy or water might be limited.
Step 4: Organize and Rotate Like a Pro
This part’s not glamorous, but it matters: keep track of what you’ve got and when it expires. I use a simple marker to write the date I bought each item on the front of the package. Older stuff goes in front, new stuff in the back. About once a month, I “shop” from my emergency food storage and cook meals using those ingredients. This way, nothing gets wasted and your pantry stays fresh. It’s not just about storing food—it’s about integrating it into your life so it’s always ready when you need it.
Step 5: Store It Smartly (Even in Small Spaces)
Don’t let a tiny kitchen stop you—my emergency food storage lives in boxes under the bed, in stackable bins in the closet, and behind the sofa. You just need cool, dry, dark spots. Airtight containers are your best friends, especially for things like flour, rice, or sugar. I also toss in a few bay leaves or oxygen absorbers to keep pests away. Label everything clearly and keep a list on your phone or taped inside a cabinet. This helps you track what you have and what you still need. Small spaces can store big peace of mind.
Step 6: Include Water, Cooking Options, and Special Diet Needs
Food is just one piece of the puzzle. You’ll also need water—at least 4 liters per person per day for drinking and cooking. If that sounds like a lot, consider water purification tablets or a filter system. Also think through how you’ll cook: a portable gas stove or solar cooker can be a game-changer during a blackout. If you have dietary restrictions (we’re gluten-free), plan accordingly. I stocked up on gluten-free flours, rice noodles, and tinned soups I can eat safely. Your emergency food storage should reflect your real needs—not just the standard checklist.
Final Thoughts: This Pantry Gave Me Peace
Creating my 3-month emergency food storage wasn’t about preparing for the end of the world—it was about preparing for real life. From floods to supply chain chaos to simple bad weather, it feels good to know I can take care of my family no matter what. And guess what? You can do this too. Start small, stay consistent, and make it personal. Your pantry can become a quiet source of strength in a world that feels anything but stable. Trust me, that kind of security is worth every grain of rice.
References:
- University of Georgia Extension: Preparing an Emergency Food Supply
- Plutus Foundation: How to Build Emergency Food Storage on a Budget
- Preparedness Mama: The Prepared Pantry – 3 Month Food Supply
- Homesteading Family: Building Up Your Long-Term Food Storage Supply
- YouTube: How to Start a Prepper Pantry | Emergency Food Supply